背景
线上一个go语言写的服务,在连续跑了10多天后,占用内存从最开始的20M左右,涨到了1个多G,有内存泄漏的问题,将整个排查过程和相应方法进行整理,做个记录。

pprof
Go语言自带的pprof工具,是检测Golang开发应用性能的利器。
pprof 采样数据主要有三种获取方式:
- runtime/pprof: 手动调用runtime.StartCPUProfile或者runtime.StopCPUProfile等 API来生成和写入采样文件,灵活性高。参考文档profiling-go-programs
net/http/pprof: 通过 http 服务获取Profile采样文件,简单易用,适用于对应用程序的整体监控。通过runtime/pprof实现。这里推荐这种方法
go test: 通过 go test -bench . -cpuprofile prof.cpu生成采样文件 适用对函数进行针对性测试
net/http/pprof
线上的服务是一直运行的,用过“net/http/pprof”可以看到实时的状态,看到各个信息指标,这里主要介绍这种方法。
1 | import _ "net/http/pprof" |

之后可以通过 http://localhost:8211/debug/pprof/CMD获取对应的采样数据
Profile翻译为“剖面,侧面等”,可以理解为当前应用的的一个剖面。可以知道哪些地方耗费了cpu、memory。
// Each Profile has a unique name. A few profiles are predefined:
goroutine - stack traces of all current goroutines- heap - a sampling of memory allocations of live objects
- allocs - a sampling of all past memory allocations
- threadcreate - stack traces that led to the creation of new OS threads
- block - stack traces that led to blocking on synchronization primitives
- mutex - stack traces of holders of contended mutexes
- goroutine: 获取程序当前所有 goroutine 的堆栈信息。
- heap: 包含每个 goroutine 分配大小,分配堆栈等。每分配 runtime.MemProfileRate(默认为512K) 个字节进行一次数据采样。
- threadcreate: 获取导致创建 OS 线程的 goroutine 堆栈
- block: 获取导致阻塞的 goroutine 堆栈(如 channel, mutex 等),使用前需要先调用 runtime.SetBlockProfileRate
- mutex: 获取导致 mutex 争用的 goroutine 堆栈,使用前需要先调用 runtime.SetMutexProfileFraction
The debug parameter enables additional output.
Passing debug=0 prints only the hexadecimal addresses that pprof needs.
Passing debug=1 adds comments translating addresses to function names and line numbers, so that a programmer can read the profile without tools.

The predefined profiles may assign meaning to other debug values;
for example, when printing the “goroutine” profile, debug=2 means to print the goroutine stacks in the same form that a Go program uses when dying due to an unrecovered panic.
以上几种 Profile 可在 http://localhost:8211/debug/pprof/ 中看到,除此之外,go pprof 的 CMD 还包括,
- cmdline: 获取程序的命令行启动参数
- profile: 获取指定时间内(从请求时开始)的cpuprof,倒计时结束后自动返回。参数: seconds, 默认值为30。cpuprofile 每秒钟采样100次,收集当前运行的 goroutine 堆栈信息。
- symbol: 用于将地址列表转换为函数名列表,地址通过’+’分隔,如 URL/debug/pprof?0x18d067f+0x17933e7
- trace: 对应用程序进行执行追踪,参数: seconds, 默认值1s
参数具体信息可以参考http_pprof
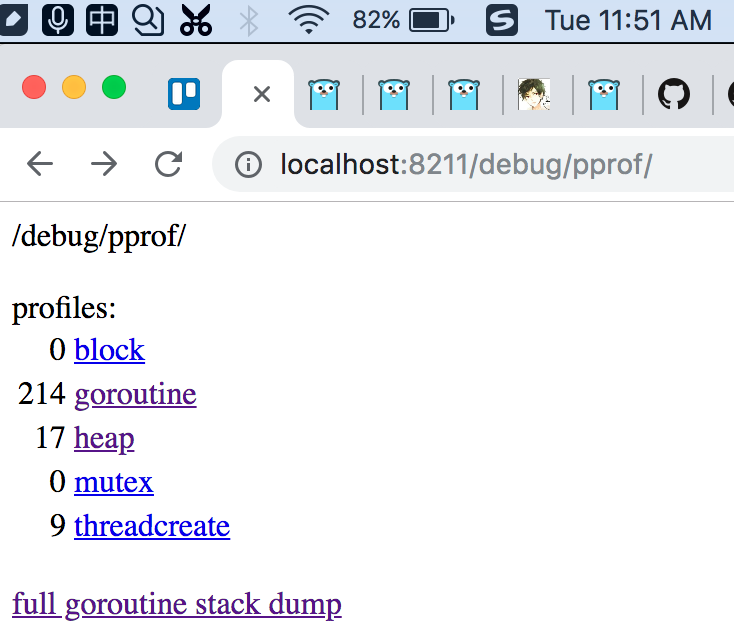
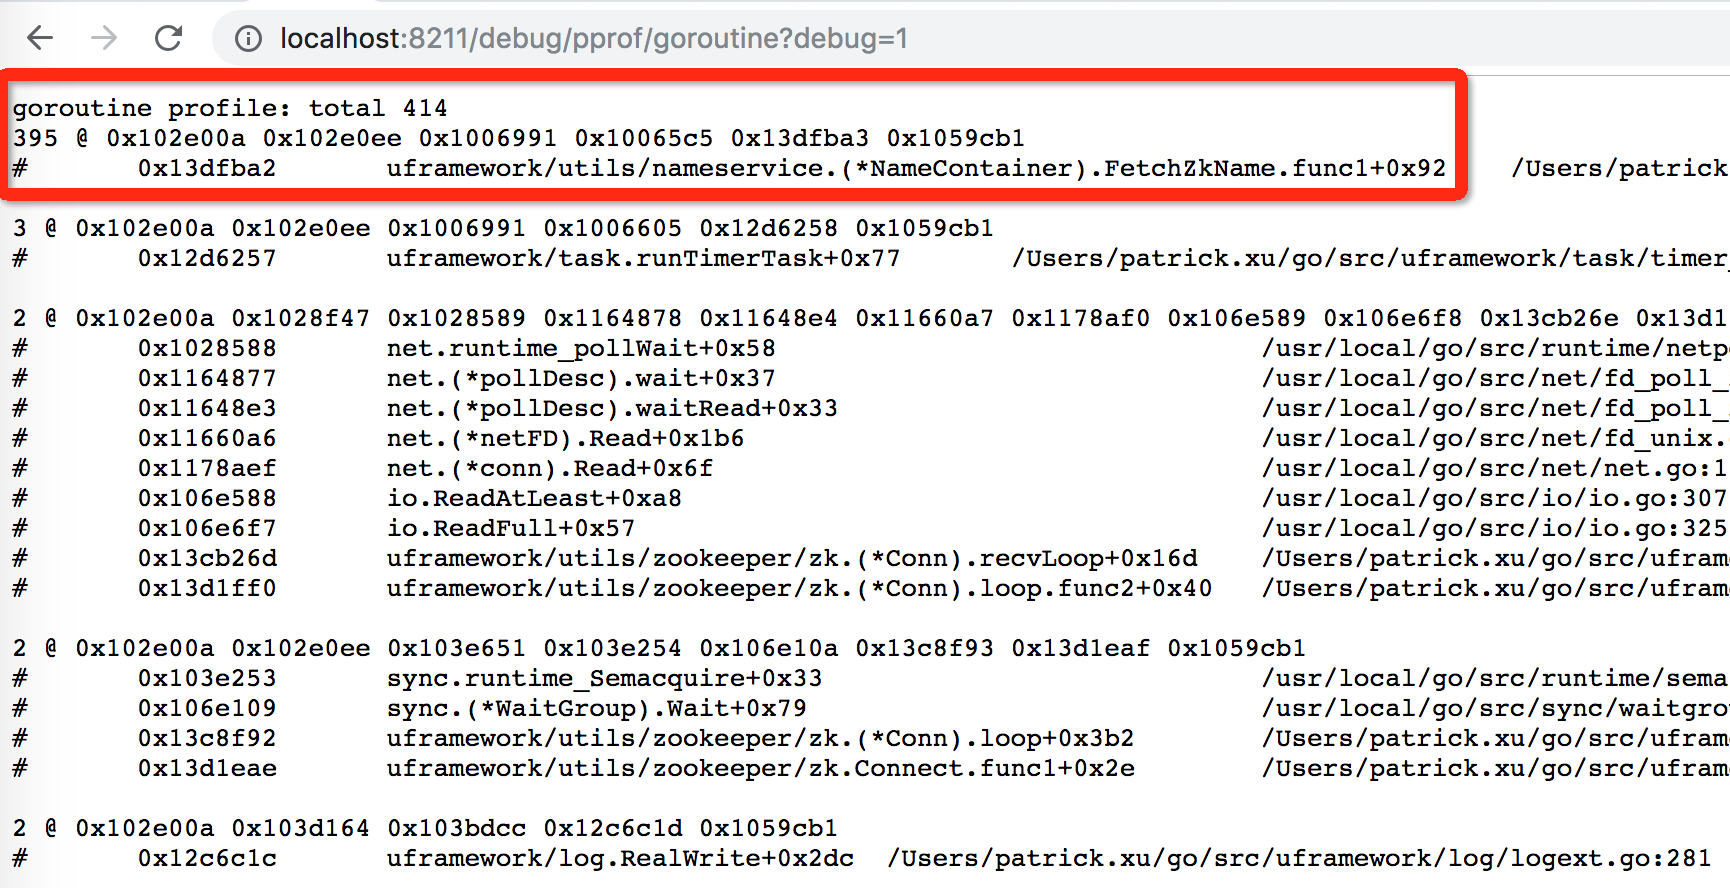
再回顾来看服务的问题,从图2中看到,goroutine的数量在一直增长;从图3看出,共起了414个goroutine, 其中395个是在调用FetchZkName。
然后再查看我们的代码,有哪里在调用go, 哪个goroutine会最终调用FetchZkName,就可以查到出问题的地方。
最终查到原因是:
1 | // 10s去更新下zk节点 |
解决方案是:UpdateInstanceFromZk()调用一次即可。
改进后,占用内存一直保持在20M左右,完美~

Go Tool PProf 分析工具
上面通过浏览器访问http服务的方式,需要有图形界面。而线上服务器通常是没有图形界面的,可以通过命令行方式来分析,或者将profile拷贝到本地,再生成调用关系图
Go Tool PProf 命令行
支持的cmd跟net/http/pprof里提到的一样
1 | go tool pprof http://localhost:8211/debug/pprof/goroutine |
以采集CPU耗时举例,
1 | # /root/go/bin/go tool pprof http://localhost:8211/debug/pprof/profile |
会经历30s的采样时间,生成pprof.uhost_server.samples.cpu.003.pb.gz,这个可以拷贝到本地分析。
最重要的分析命令是top N
topN 命令可以查出程序最耗 CPU 的调用
1 | (pprof) top 5 |
- flat / flat% : 函数占用CPU的运行时间和百分比
- sum% : 按列累加的累计占用CPU百分比
- cum / cum% : 采样过程中, the function appeared (either running or waiting for a called function to return).
top -cum
以累加的方式,看出消耗cpu的函数运行。可以和后面图形的方式做个对比
1 | (pprof) top10 -cum |
list Func
显示函数名以及每行代码的采样分析
1 | (pprof) list dec_slice_struct_message |
web / web Func
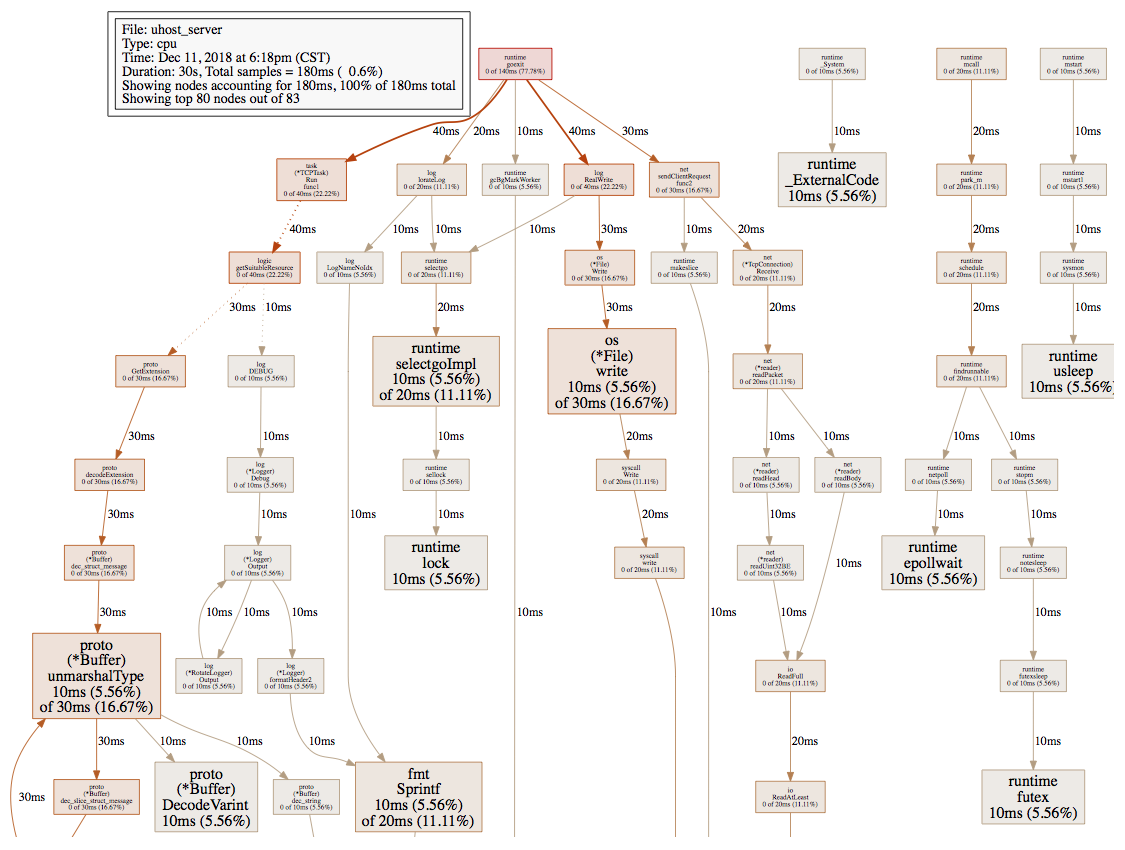
显示调用图 / 显示某个具体函数的调用图
mac上需要先安装graphviz http://www.graphviz.org/
homebrew安装完毕后运行 brew install graphviz即可
1 | ➜ uhost-go git:(from_pxu) ✗ go tool pprof uhost_server pprof.uhost_server.samples.cpu.004.pb |
但是web命令生成的调用图往往是残缺的,不知道是什么原因。但找到下面更好的方式。
本地显示远程的调用图(推荐)
后来返现一种更易用的方式,服务在线上运行,本地浏览器直接打开调用图。
线上服务器ip为172.21.212.101,pprof监听端口为8991。
下面还是以cpu耗时为例
1 | [root@gw ~]# go tool pprof http://172.21.212.101:8991/debug/pprof/profile |
然后在线上服务器再起一个8992的端口
1 | [root@gw ~]# go tool pprof -http="172.21.212.101:8992" http://172.21.212.101:8991/debug/pprof/profile |
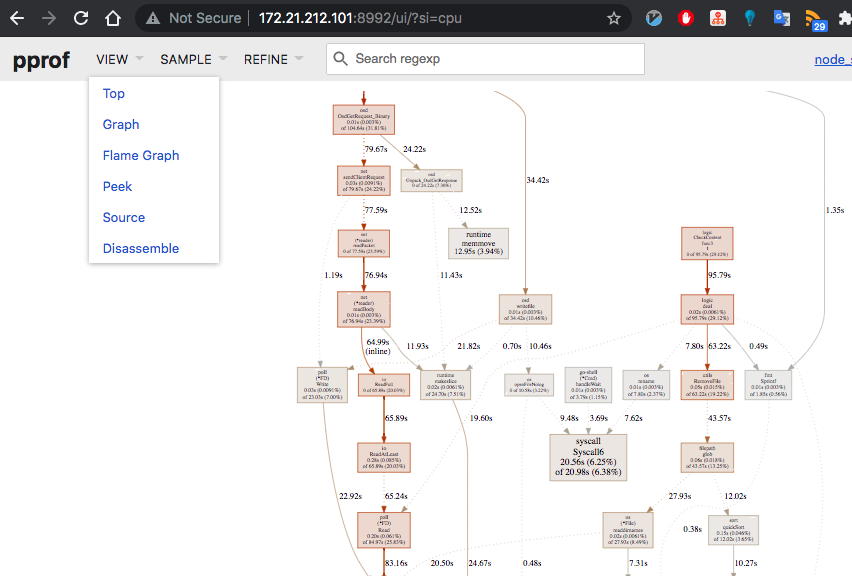
在本地浏览器可以直接打开web UI

还有火焰图,汇编代码等,功能更加强大。
pprof
As of Go 1.11, flamegraph visualizations are available in go tool pprof directly!
This will listen on :8081 and open a browser.
Change :8081 to a port of your choice.
$ go tool pprof -http=”:8081” [binary] [profile]
If you cannot use Go 1.11, you can get the latest pprof tool and use it instead:
Get the pprof tool directly
$ go get -u github.com/google/pprof
$ pprof -http=”:8081” [binary] [profile]
由于我的Mac上用的是go1.8.1版本,所用pprof命令。
1 | ➜ uhost-go git:(from_pxu) ✗ pprof uhost_server pprof.uhost_server.samples.cpu.004.pb |

其他工具
- delve
https://github.com/derekparker/delve - go-torch 生成火焰图
https://github.com/uber/go-torch
以后用到了再整理,这里mark下